
Why a new planning?
With the revamped planning, you work faster and with a clearer overview than ever. Thanks to the new layout, you have better insight into the planning straight away, you can shift things around more easily for optimal staffing, you can see travel times immediately, and from now on you plan with teams. This makes planning not only clearer, but also a lot more efficient.
On this page we explain what is new and how the screen is structured. In the other articles in this section, you can read how each part works.
What has changed?
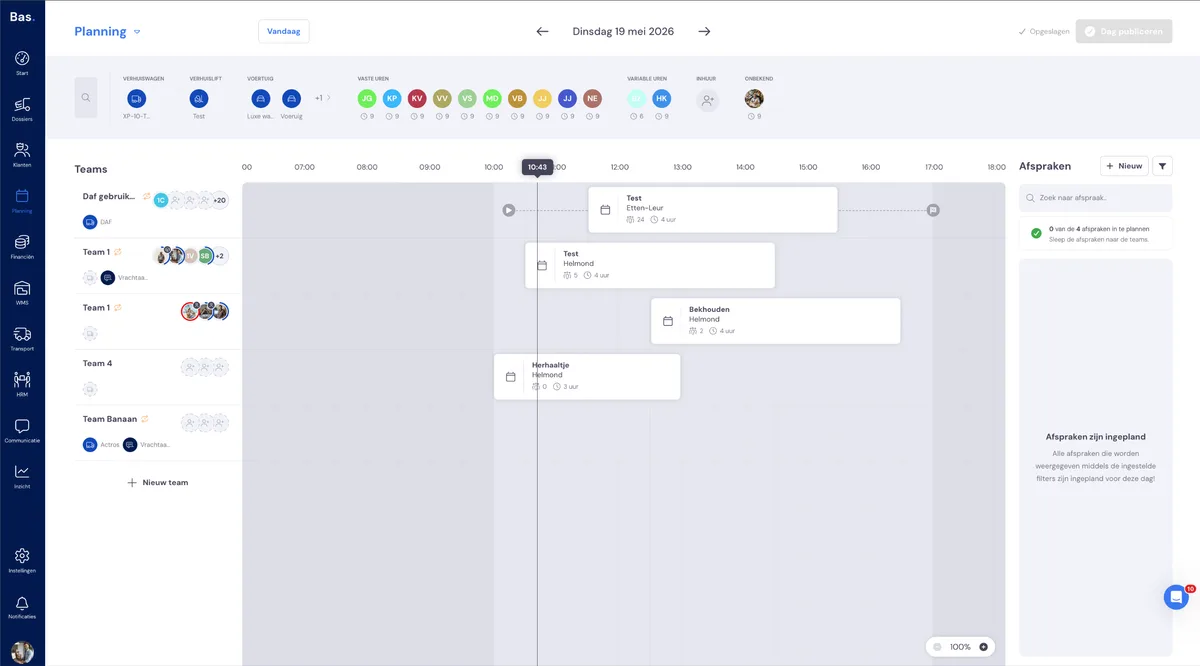
You still plan with drag & drop — that works just as you are used to. What has changed is how your planning is organised, what information you have directly in view, and how much control you have over when the planning goes out to your employees and customers.
Teams instead of separate staffing
In the current planning, you assign employees and vehicles per appointment. In the new planning, you first put teams together. A team consists of employees and a vehicle, and possibly a trailer.
You then link appointments to a team. The advantage: you build your crews once and plan with them for the whole day.
Horizontal timeline
The current planning shows the day as a vertical grid with hours running from top to bottom. The new planning turns this around: teams are on the left, and time runs from left to right. This way you can see per team what is planned for that day and in what order, you can see multiple appointments in a row, you can see the travel times, and so you know exactly whether your day is well planned and whether your employees are being deployed efficiently.
Appointments panel
Appointments that still need to be scheduled are shown in a separate panel on the right-hand side. From there, you drag them onto a team's timeline. In the current planning, appointments are already in the grid.
Capacity circle per employee
Next to each employee on a team, you will see a coloured circle around their photo. This shows how many of that employee's available hours have already been scheduled:
Blue — the employee still has room in the schedule
Green — the employee is nicely booked up for the day
Red — the employee is scheduled for more than the available hours
The circle is updated immediately with every change. This way you can see at a glance whether you are scheduling an employee too much or too little. The planning does not block at red — just as now, you always decide for yourself whether the staffing fits.
Travel times are calculated automatically
In the new planning, travel times are calculated automatically and shown on the timeline. If you plan several appointments in a row for a team, the travel times are adjusted to the actual route: from the warehouse to the first job, from the first job to the second job, and from the last job back to the warehouse.
In the current planning, the travel time is calculated per appointment, always to and from the warehouse. With multiple appointments in one day, the travel times are therefore not always correct. In the new planning, you always have the correct travel times in view.
Fixed teams that return
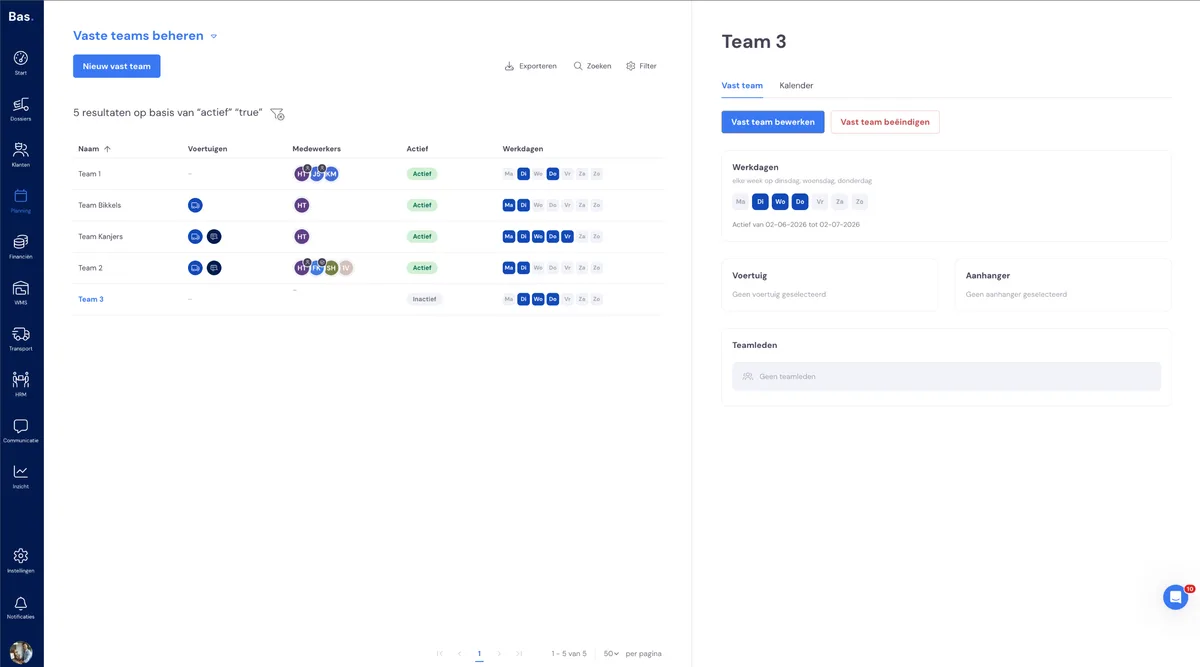
Do you have teams with the same people and the same vehicle every week? Then set them up once as a fixed team.
A fixed team automatically returns on the working days you set, so you do not have to put it together again every day. You will see a fixed team on the board straight away; if you change something on the day, it only applies to that day. In the article Teams, vehicles and employees you can read how to create and manage fixed teams.
Recurring appointments
Some appointments return according to a fixed pattern, for example every week on the same day. You do not have to keep scheduling such recurring appointments again and again. If you change a recurring appointment on the board, by default only that one day changes — the rest of the series stays as it is. If you want to change the whole series, you choose to do so yourself. In the article Recurring appointments you can read exactly how this works.
Your planning is saved automatically
In the new planning, you no longer need to click a save button. Every change you make is saved automatically. At the top of the screen you will see the status: "Saving…" and then "Saved". So you can carry on working without worrying that anything will be lost.
Decide for yourself which emails you send
In the current planning, emails to customers are sent automatically with every change. If you move an appointment or change a time, the customer immediately receives an email — even if you are still busy planning.
In the new planning, this works differently. You first build up your entire planning without anything going out. Only when you publish the day (see below) do you get an overview of all the emails that are ready. Emails are prepared for new appointments and for changed times — not for team changes. For each email, you choose whether or not to send it. This prevents customers receiving unnecessary messages while you are still planning, and gives you full control over the communication with your customer.
Publishing the planning
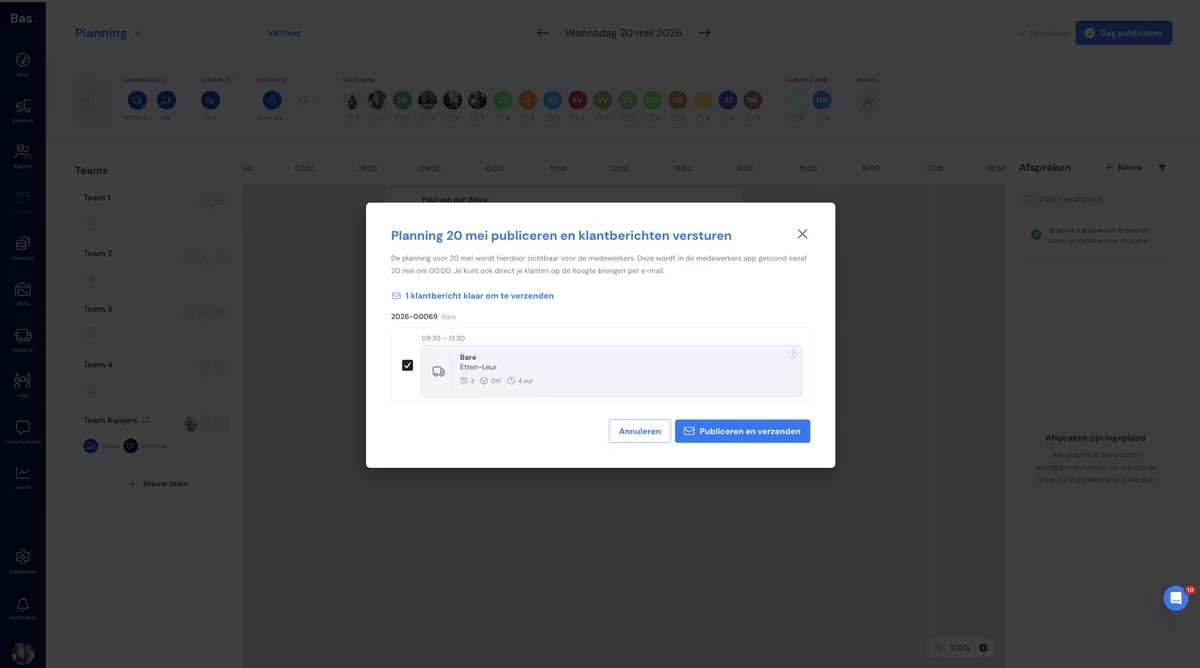
The "Publish day" button at the top right and the publish overview with the emails. Take a new screenshot and place it here before publication.
Because your planning is saved automatically but does not go out immediately, there is a separate step: Publish day. With the button at the top right, you publish the day. You will first see an overview of the new and moved appointments and how many customer messages are ready. Only after publishing do your employees see the planning in their app and are the selected emails sent to the customer.
As long as there are unpublished changes, you will see a notification of this. If a colleague is working in the same day at the same time, you will get a warning so that you do not overwrite each other's work. You can read more about this in the article Confirming the planning and sending emails.
Extra team on an appointment
Do you need help from another team on a large job? Hold down Shift and drag the appointment to another team. That team is then linked to the appointment as an extra team, instead of the appointment being moved. This way, you can work on the same job with multiple teams.
The screen in four parts
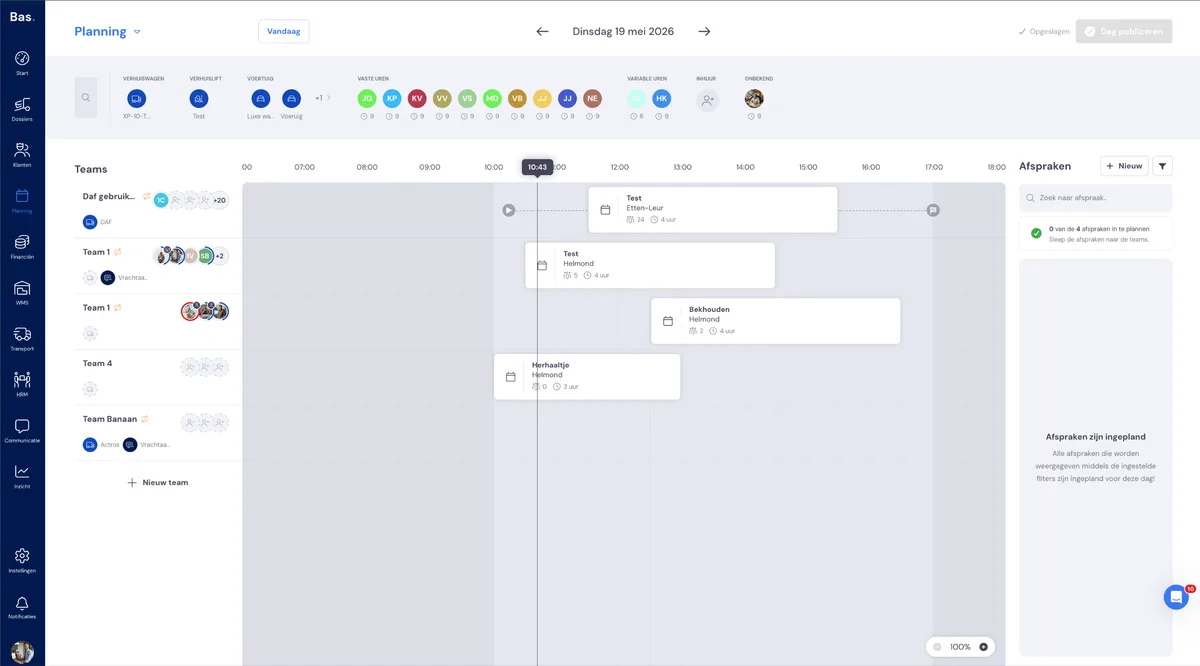
The new planning shows one day at a time. If you have set up fixed teams, they are already there ready for that day. For the rest, you put together separate day teams. If you go to a day without fixed teams and without any planning, you start with empty teams.
1. Employees and vehicles (at the top)
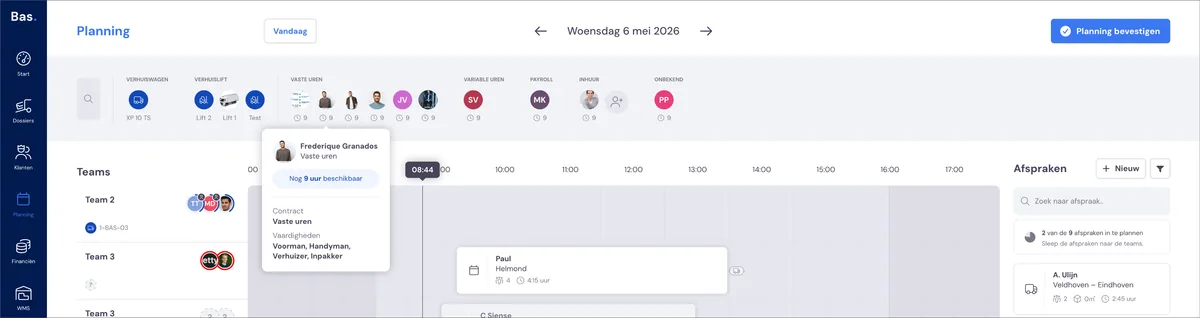
All available employees and vehicles for the day. Employees are grouped: permanent contract, variable and hired. Vehicles are on the left. Next to each employee you can see the available hours. Employees who are off sick or on leave are listed under 'Not available'. As soon as you drag someone to a team, that person disappears from the bar. This way, you can always see who is still available.
2. Teams and timeline (middle)
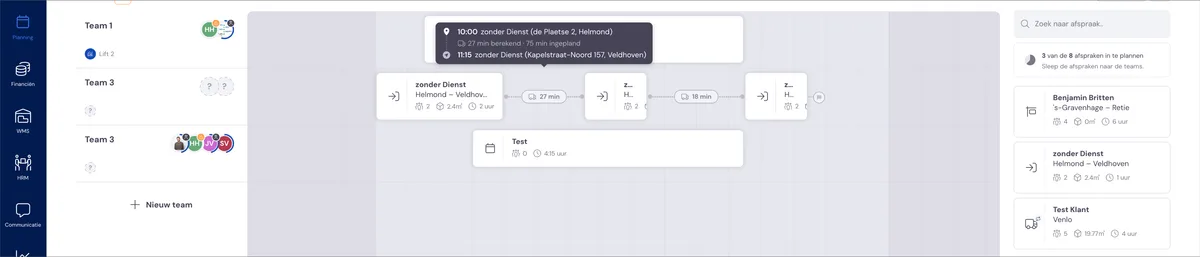
The teams are on the left, and the timeline runs through the middle. You drag appointments from the appointments panel onto a team's timeline. For each employee on the team, you can see the capacity circle. Travel times are shown automatically between the appointments.
3. Appointments panel (right)
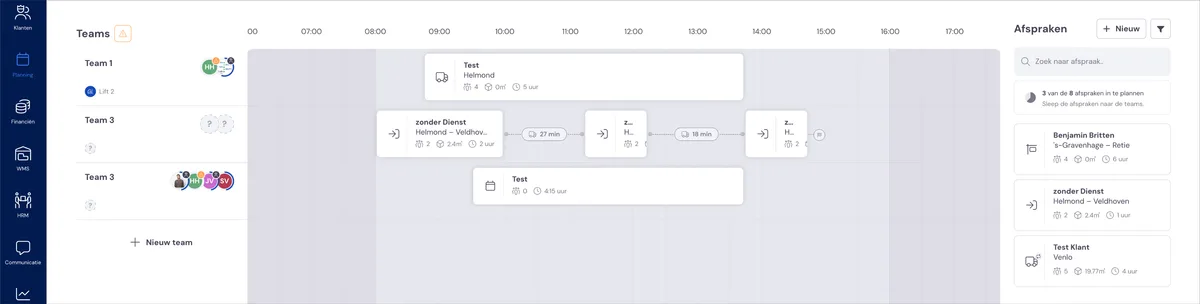
All appointments that still need to be scheduled. For each appointment, you can see the customer name, the address, the type of appointment and how many employees are needed. You can search and filter. As soon as you drag an appointment onto the timeline, it disappears from the panel. If you drag an appointment back to the panel, it is unscheduled again.
4. Detail screen (right)
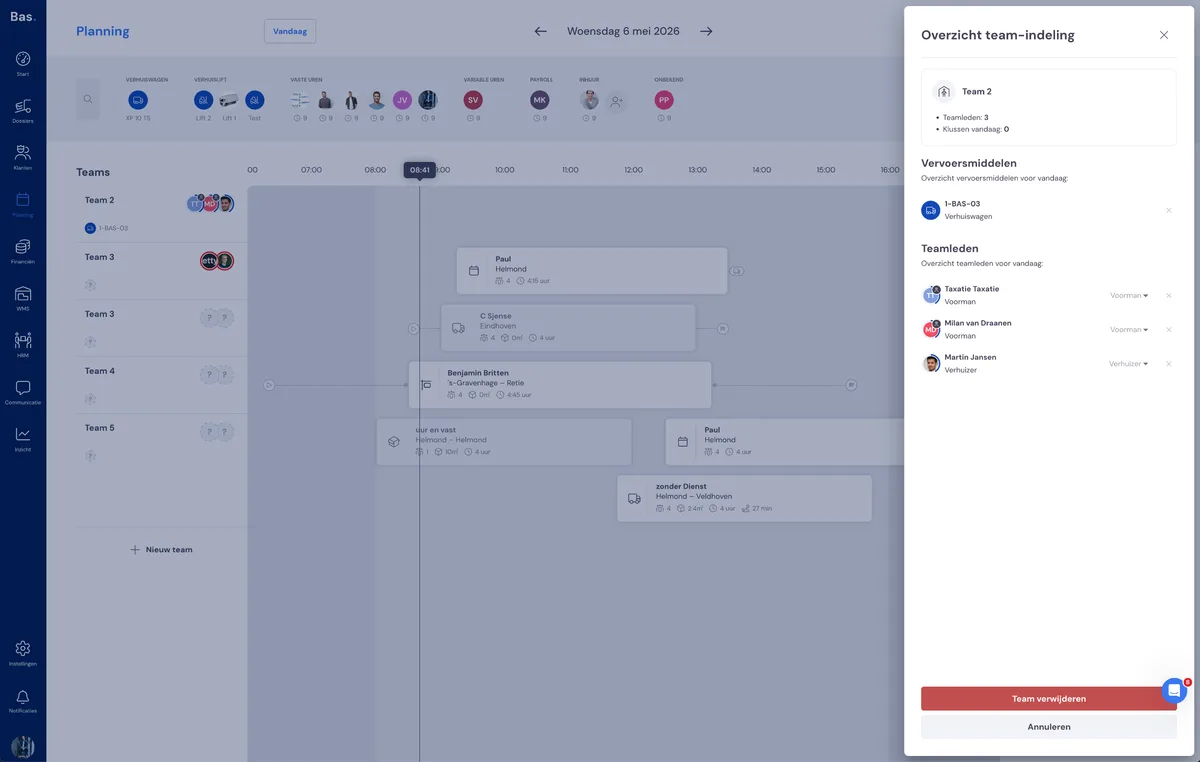
Click on a team or on an appointment in the timeline to open the detail screen. Here you can see all the information about the team (who is deployed, in which role, etc.) or about the appointment (description, dates, etc.). Your changes in the detail screen are saved automatically.
Read more
More about the new planning: